Learn to Set Up Threat Protection

Get UsenetServer’s unbeatable
defense against malware.

Participate in ongoing conversations on a wide range of
topics with like-minded users.

Get Started
30-Day Money-Back Guarantee
Excellent
Ratings
Based on 1,091 reviews
A woman sits at a desktop computer, setting up UsenetServer’s threat protection.
A man looks at a mobile phone that is connected to UsenetServer’s VPN with threat protection activated.

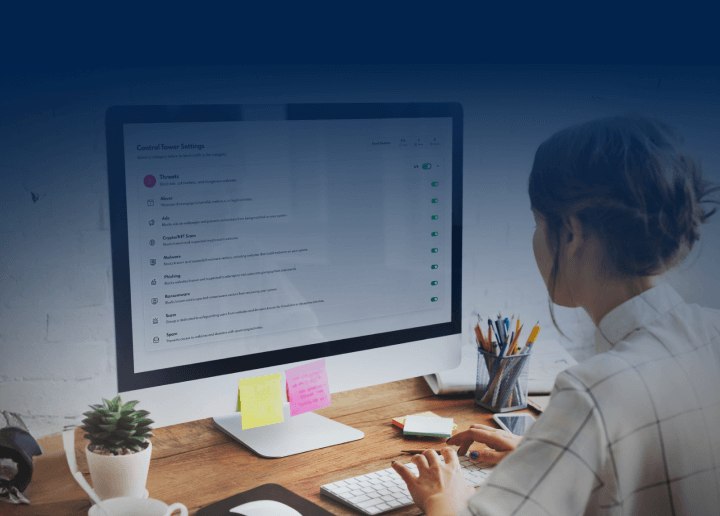
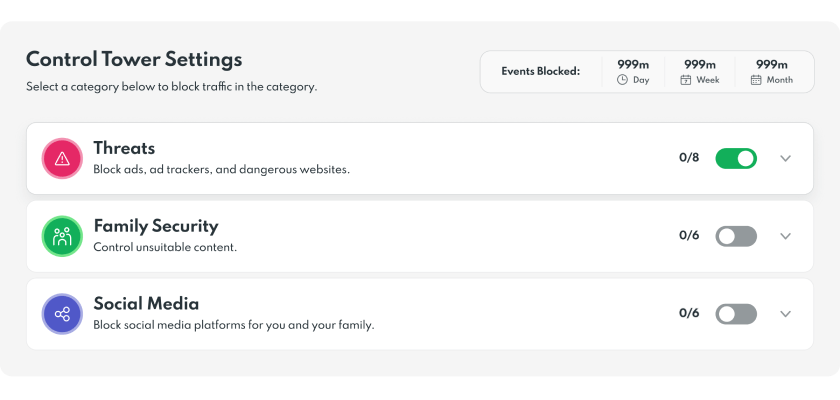
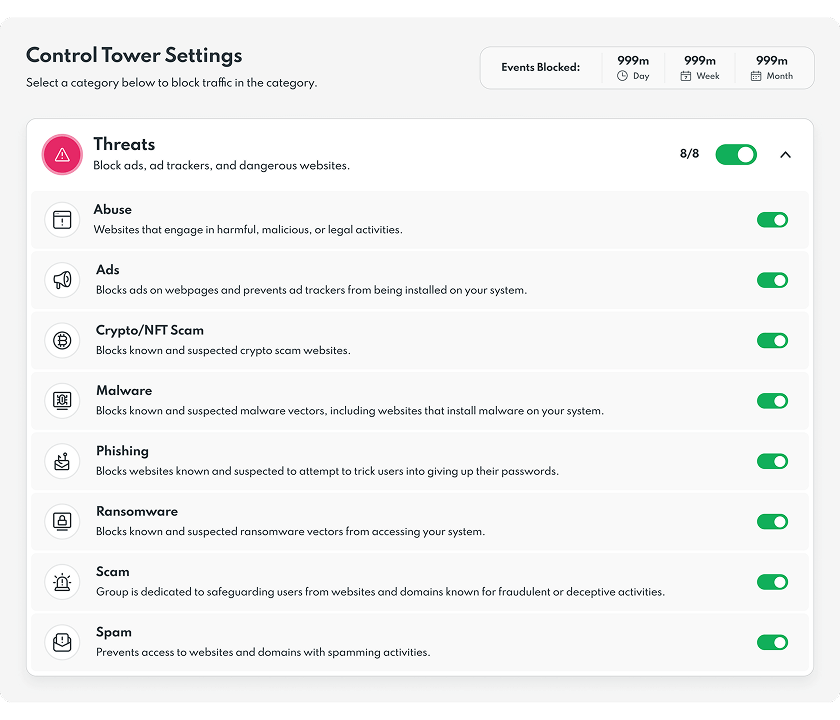
Getting Started with Threat Protection from UsenetServer

Protecting yourself online is becoming increasingly important. That’s why UsenetServer is proud to offer our users access to premium security features like our powerful VPN with features like threat protection that reduces the chance of online risks like malware and phishing attacks. Learn how to set up your threat protection UsenetServer in just a few simple steps.

30-Day Money-Back Guarantee

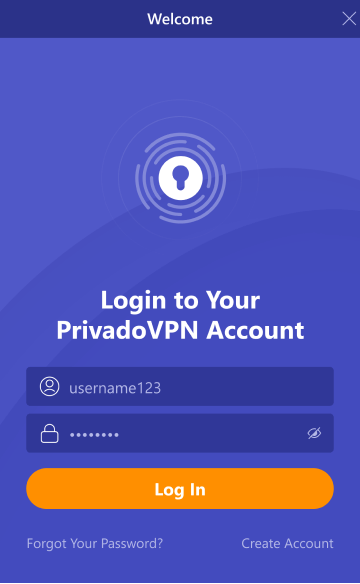
Set Up UsenetServer’s Threat Protection

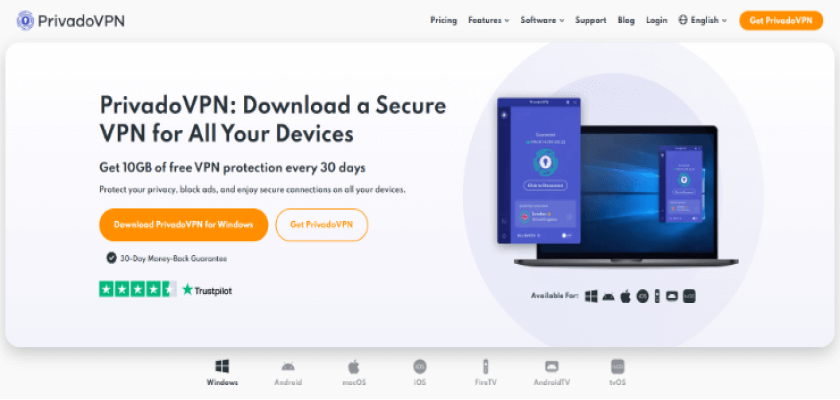
We’ve partnered with PrivadoVPN to offer a full-service security suite that comes with secure encryption, Smart DNS functionality, built-in ad-blocking, and advanced threat protection. This all-in-one software works effortlessly on any device to offer premium privacy and security when you need it most.

Step 1
Download Our VPN
The PrivadoVPN homepage.
Access our premium VPN here and download it onto the device of your choice. Our VPN is available for both PC and macOS computers, tablets, smartphones, routers, and gaming consoles.
Step 2
Open the VPN and Sign In
The PrivadoVPN app login page.
Once you have downloaded the VPN, open it on your device and sign in using the credentials that were provided during the sign-up process. This will give you complete access to all the VPN features.
Step 3
Locate the Control Tower Feature
The control tower settings from PrivadoVPN showing different options for online security.
After opening UsenetServer’s VPN on your device, access the menu and select the Control Tower option.
Step 4
Turn On the Threat Protection Settings
The control tower settings from PrivadoVPN showing different options for online security with the ‘Threats’ tab activated.
Once you are in the app and you have made your way over to the Control Tower, select the option labeled “Threat Protection” and toggle the different settings for ‘malware blocker’ to “On.”
Step 5
Personalize Your Experience
A list of the different threats that PrivadoVPN’s threat protection settings block.
To further customize your VPN experience, select the ‘View All’ option in the threat protection menu. From here, determine which of the advanced features you want to enable tor disable.
A shield sending electronic lines across the globe, symbolizing unlimited security for UsenetServer users around the world.

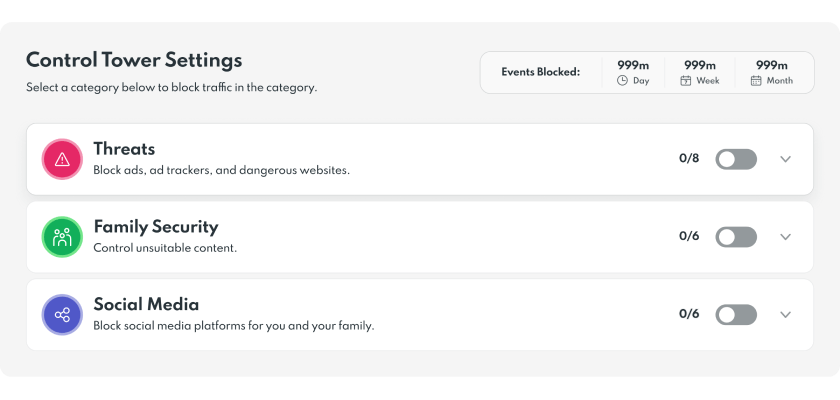
Get More Security with UsenetServer’s Threat Protection

Our unbeatable VPN offers industry-leading security and safety that you can take with you anywhere you go. Enjoy traveling without risks or worrying about invasive malware. Simply activate the threat protection settings and never think twice about unwanted threats again.

30-Day Money-Back Guarantee

30-Day Money-Back Guarantee

If you're not completely satisfied with UsenetServer after 30 days, you can cancel your subscription and receive a full refund at any time thanks to our money-back guarantee.

Tom's Guide
TechRadar
Top Ten USENET
Best Usenet Reviews
A woman wearing a headset is helping a customer over the phone, symbolizing UsenetServer’s 24/7 customer service.

Need Assistance?

Our incredible team of knowledgeable support agents is available 24/7 to answer all of your questions. Whether you’re looking to get started with Usenet or install a VPN, we’re here to help.